
It's so good to have Andrew back! Today, I went Christmas shopping with my Dad as he needed some help picking out stuff for the kids. He's pretty much going to be the coolest grandpa on the planet according to Mickey because he's getting the kids Pillow Pets. Have you seen these? Are they going to make an appearance under your tree? I don't get it but hey, Little Man loves 'em!
When I got home, Mickey and I got started on a little craft I thought up. I took pictures as we went along so I could share it with you. I hope you like it!
First up, the goodies you need to get started. A piece of chipboard (not too thick as you'll need to be able to cut and fold it), a large star to trace, a ruler, a scoring tool, tin foil, plastic wrap, scissors, tape and markers. Oh, later you'll need a glue gun and a pipe cleaner, too!
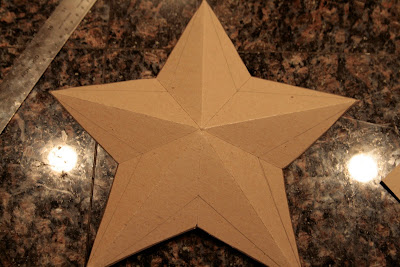
 I traced my star out on the chipboard. You can hand draw this if you'd like but I have a bunch of barn stars hanging in our entry so I just grabbed one of them. :)
 Then, I added a little to it so that when we fold the star it won't look too skinny. I just lined up the ruler from one point to the opposite valley and drew a dot about an inch out. Then I redrew the star using these new dots and the original points.
Then, I outlined that in black marker so I'd be sure to cut on the correct lines. (I get easily distracted!)

Then, I just cut out my star. (At this point, Mickey started getting restless so I'd suggest getting some of this done ahead of time.)


I scored a line from each point to it's opposite valley.
Here's the center with just one more line to score.
Now, fold along all of your score lines. I figured folding and scoring now would be a ton easier than later along in the process. Cute, huh? I've seen this barn star tutorial floating around before and filed it away for scrapbooking. I still haven't used it for scrapping!
Now, we're going to wrap this star with tin foil. You want to make sure that the foil is shiny side up and that you give it a good crinkle before you wrap it on the star.

I was "lucky" enough to have quite a few pre-wrinkled pieces available as Aud got into that drawer a few days ago. Heh! We taped the back but that was mainly to give Little Man something to do. :)
 Here's the covered star. I had to crinkle my own foil on the left side and I didn't do near as good a job as Miss Thing so I highly suggest enlisting the help of a 20 month old to crinkle your foil for you. ;)


Here's the covered star. I had to crinkle my own foil on the left side and I didn't do near as good a job as Miss Thing so I highly suggest enlisting the help of a 20 month old to crinkle your foil for you. ;) Next, you'll need a piece of plastic wrap larger than your star. Lay it over your star...

and then flip it over and start taping down (or having your helper tape down) the plastic wrap. I cut from the edge of the plastic wrap into the dips of the star so they'd wrap nicely.
Now, flip it over and put it onto a protected surface and have your helper color away!!!


We started with some junky old markers I had set aside for the kids to scribble with, as you can see, these just weren't cutting it. Not enough oomph and the nibs were too thin, I was afraid he'd rip through the plastic wrap and I was pretty sure he'd definitely lose interest at that point. LOL!
So, I told him that I was going to dig out Mommy's special pens! He was pretty excited at that. I grabbed my Bic markers (just like Sharpies) and we picked out eight bright colors for him to use.

Here is his completed masterpiece. He was starting to slow down so I helped fill in some of it and then touched up some areas once he was done. (These things look cooler when the silver is all covered up.)

 Ready for what you say? Well, to go on top of your tree of course!!!
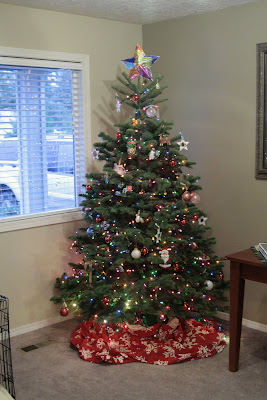 Here's a little close up. I sooooo love this little tree topper!
 I've always had such a hard time with finding toppers that I like. I've actually just gone without before. I found a lovely silver star about two years ago and that is currently on my formal tree. So, I came up with this little project that gives just the perfect handmade, bright, colorful touch to our fun, family tree!
I hope you like our little project, Mickey had fun and he loves the new star, too!
Now, flip it over (wait a while if your ink is still a little wet or just blot it on your protective surface like I did) and hot glue gun a pipe cleaner to the back. If you don't have any pipe cleaners, you could always use a toilet paper roll or part of a paper towel roll attached vertically. Refold your star (mountains on the points and valleys in between) and it's ready!!!
 Refold your star (mountains on the points and valleys in between) and it's ready!!!
 Ready for what you say? Well, to go on top of your tree of course!!!
 Here's a little close up. I sooooo love this little tree topper!
 I've always had such a hard time with finding toppers that I like. I've actually just gone without before. I found a lovely silver star about two years ago and that is currently on my formal tree. So, I came up with this little project that gives just the perfect handmade, bright, colorful touch to our fun, family tree!
I hope you like our little project, Mickey had fun and he loves the new star, too!
ps~You could totally make smaller ones with you kiddos and either hang them on your tree or give them as gifts! Just glue two of them back to back with a loop of ribbon sandwiched in between. Try ornament shapes, candy canes, Santa's, anything Christmas-ey would be great!
1 comment:
that is cute! little man did a good job!
Post a Comment